
Whether you’re planning to purchase a wireless bridge or are a networking enthusiast who wants to learn about this, this article has got you covered. Not only you’ll learn what is a wireless bridge, but also get information about different types of wireless bridges, how to use them, and also a bonus section that explains steps to use an old router as a bridge.
Table of Contents
- So, What is a Wireless Bridge?
- Why Use Wireless Bridge and How does it Work?
- Types of Wireless Bridging
- How to Extend the Network With Wireless Bridge?
- Using the Old Router as a Bridge: How to make this work?
- Access Point vs. Wireless Bridge vs. Repeater
- Conclusion
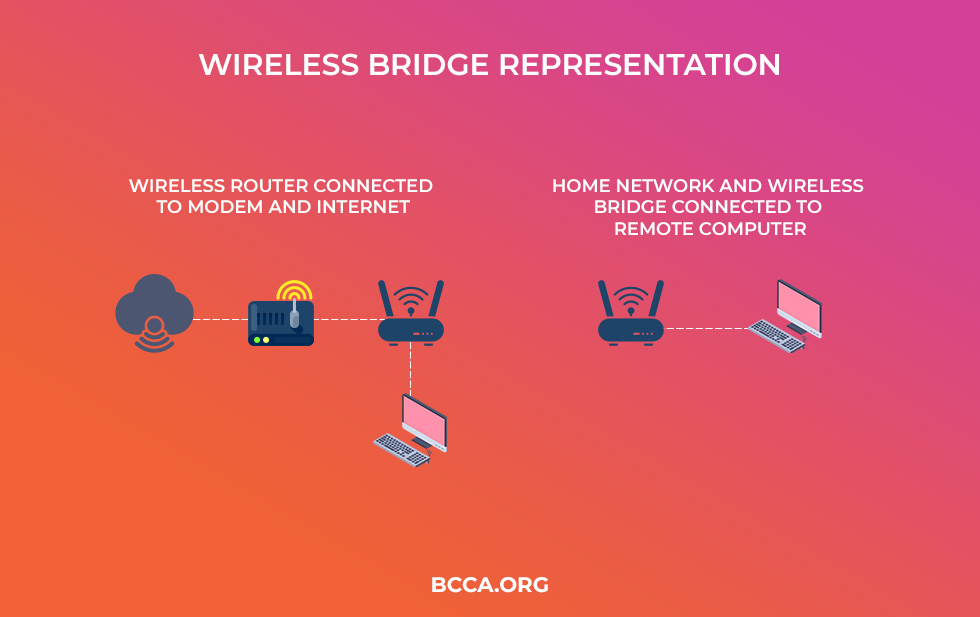
So, What is a Wireless Bridge?
In simpler terms, a wireless bridge is also a routing device that takes a wireless connection further from a router and makes it available across a distance.
From a layman’s perspective,
A wireless bridge is more of a concept, ideated using a specific set of gadgets. While wireless bridging, on a small scale, is used to connect a wired infrastructure to a wireless one via a routing agent, the main aim of the same is to spread out the network and make it widely available.
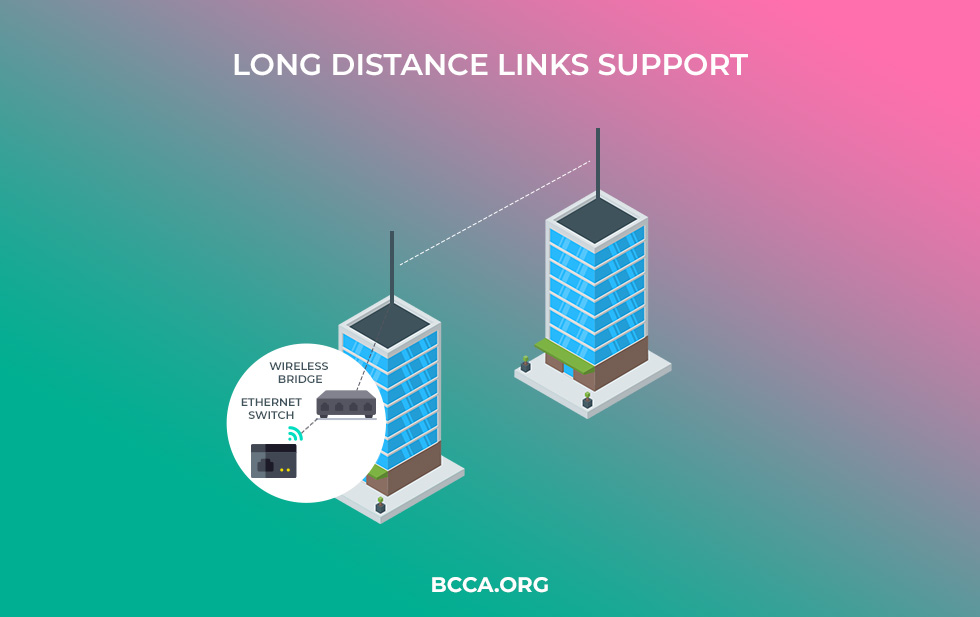
As far as the technological premise is concerned, these bridges use RF signals, especially in the Microwave region, which then calls for the inclusion of high and low gain antennas, depending on the relaying distance.
Also, in certain cases, where the transmission distance is larger than usual, the bridges are paired with optical receptors and antennae, whilst being termed as the FTA bridges. That said, links established by the bridges are strictly point-to-point as opposed to the usual broadcasts that cater to every receiver in the vicinity.
Why Use Wireless Bridge and How does it Work?
Imagine your ISP-provided wireless network to be the only inlet for connectivity. As long as you place devices in close proximity, a router can suffice and relay the network to the concerning gadgets.
But, have you considered the possibility of the devices being far away from the router! While Switches are decent options, to begin with, you need excessive wiring to make the best use. Access Points can also be considered if the initial connection still requires an Ethernet inlet to the router.
Therefore, despite being highly useful, Switches and Access points feel underwhelming if you are trying to relay a network between two remotely located points, i.e. different stories of the same building or even two adjacent buildings.
Also, even if you can manage to wire around an access point, you would only be able to target wireless devices at a distance as the output doesn’t pertain to wired connections.
This is the reason Wireless Bridges are preferred: As they allow you to establish a wireless relaying connection from the router to the Bridge, which can then be used to connect even the wired devices or relay to another bridge, via Radio Frequency.
That’s not the only set of reasons why wireless bridging is preferred. Physical links to certain gadgets are necessary, which cuts out the chances of VPN connections. Plus, if the offices and campuses are spread far and wide, leasing lines can be quite an expensive affair. Also, VPNs aren’t always preferred by corporate houses owing to the latency and bandwidth issues.
Apart from that, here are some of the other reasons that urge you to rely on wireless bridges:
- Electrical interference between the Ethernet components
- Slow wired links
- Legal issues concerning wiring
But then, to understand how the Bridge works, we need to go over the concept of Wireless Distribution System:
WDS or Wireless Distribution System is one technology or rather concept that allows APs to pair wirelessly with each other. However, if you only have a standalone access point by your side, connecting the router wirelessly isn’t always possible.
As WDS uses Mac-Based transmission, where the source address, Basic Service Sets ID, and destination address are mentioned, it actually forms the backbone of wireless bridging. Plus, the access point fails if the devices to be connected only have Ethernet adapters within, making it literally impossible to connect them wirelessly to the network.
Therefore, it wouldn’t be wrong to consider two wireless access points as a bridging connection as in this case the AP acts as a router. Therefore, an access point immediately preceded by another can be considered a wireless bridge. But the reverse analogy doesn’t hold.
Plus, a standard wireless bridge functions using the 802.11 Wireless Protocol and comes equipped with several Ethernet ports. Not just that, the WDS makes it possible to connect a wireless bridge to only one mother device or even set up long-distance bridging support.
In simpler words, the established network bridge brings together multiple network segments under the same roof as per Layer 2 of the OSI networking model. Better termed as the ‘Data Link’ layer, this form of transmission is the backbone to set up network hubs and repeaters.
Also, the radio link can be used to use the bridges as repeaters, thereby moving a network across miles, albeit with reduced throughput. However, there are different types of bridges with some having Ethernet-based elements to work with.
Therefore, it wouldn’t be wrong to state that a wireless bridge allows you to connect two different network infrastructures, as per your preferences.
Types of Wireless Bridging
Firstly, it is important to note that wireless bridging is a massively confusing concept. While some might categorize bridging as per the connections they establish, certain technicians prefer segregating the same as P2P or P2MP bridges, depending on user preferences.
Wireless bridging can also be segregated into MW or RF bridges and FSO links where optical signals are prioritized over anything else. As per licensing, wireless bridges are segregated as Licensed and even exempted bridges.
Finally, there are NLoS and LoS bridges depending on the orientation of the antenna that you would be used for connecting to network infrastructures.
In the subsequent sections, we shall talk about each wireless bridging concept whilst shedding additional light on how they work and the best usage scenarios.
Based On Hardware
1. Wi-Fi to Wired Bridging
Wireless to Ethernet bridging is probably the most common, as it makes the ISP-provided internet available to the devices that best respond to the Ethernet connections.
As far as functionality is concerned, this form of bridging is best suited for a secondary network infrastructure that isn’t located far off from the router. Upon placing a bridge with a high-gain antenna by its side, it becomes possible to route the wireless internet connection to the secondary router.
The secondary router or the bridge feeds into the primary router as a client and takes a decent part of the connection directly to the wired devices.
Imagine, your gaming console or Smart TV is located far off from the router and the landlord doesn’t allow you to lay down wires for direct, Switch, or WAP-based connections. This is the point where you can rely on this form of bridging.
2. Wireless to Wireless Bridging
Two WAPs connected across a wireless network is probably the best representation of wireless-to-wireless bridging. This concept brings together two wireless connections and is meant for homes that are expansive and cannot be covered by a single secondary router.
However, unlike a basic Access Point, the secondary device often involves Ethernet ports, thereby allowing you to establish Ethernet connections, if and when necessary.
Bluetooth-Wireless Bridging
Certain gadgets are capable of establishing Bluetooth connections with the secondary router. However, in most cases, this form of bridging is only meant for consumer gadgets and restricted to smaller distances. The throughput is usually on the lower side and only good enough if you are on a home network.
Based On Topology
1. P2P Bridging
The simplest form of bridging, Point-to-Point connections are pretty basic and do not require advanced hardware components. Plus, these connections are easy to configure and are meant for connecting networks that aren’t sparsely located.
These connections are meant for premises having two separate networks to deal with. Imagine there is a remote warehouse that needs to be connected to the original ISP via a bridge. P2P bridging makes sense in this context as you can individually pair the existing one with the network that needs online.

The first network usually feeds into an access point, which relays the same to another access point, thereby creating a bridge of sorts. However, this topology-based connection also allows you to connect two different wireless networks together.
2. Point-to-Multipoint
This type of connection is used for working with several networks, whilst helping each feed from the parent network. There is a root bridge to work with, which allows one network to connect with the other.
For instance, a big educational campus relies on P2MP connections as different sections have different networks to rely on, which can only be accessed via a base station or a root bridge. Therefore, if the organization has the main internet connection, the multipoint topology allows you to connect each section of a big area with the primary network.
Each access point allows some data to pass, depending on the requirements, but the same first needs to clear the base station.
Based On Connection Technology
1. RF or MW Bridging
Radio frequency or Microwave Bridging comes into the mix if you are trying to connect regions or topologies that are far off and require something better than basic receivers.
The usage of radio signals for transmitting and receiving packets and data adheres to the simple concept of microwave banding. Therefore, a majority of these transmissions take place in the 30 to 80GHz range of the spectrum.
The best thing about these bridges is that you can use them across a wide range of licensed and unlicensed frequencies. In case you are interested in learning more about the region-specific frequencies, here is a quick roundup of the best resources in hand.
If you are in the United Kingdom, 2.4GHz and 5GHz bands are the more common transmission zones followed by the near field, 60GHz band. However, the 60GHz band is more suited towards bridging networks that adhere to adjacent buildings, owing to its power and ability to transmit data packets.
However, RF bridging also offers the flexibility of using unlicensed links, which are great for connecting the suburban networks. Plus, the links are faster to establish and way cheaper as compared to the licensed ones. Not just that, regions plagued by bad weather conditions make the best of the RF bridging technology.
If you are concerned about the speeds, the 70GHz, and 80GHz bands offer the best throughout and performances, with the transmission rates reaching up to 1.25Gbps. Still, these bands aren’t easy to procure as they are mostly licensed and allocated to corporate players. Plus, they are good enough for bridging connections for distances reaching up to 100km.
2. LOS Connections
More than being a type of bridging technology, it is a concept that Radio Frequency bridges need to adhere to. Any wireless bridge looking to perform at full throughput must take the LOS considerations seriously.
However, the LOS preferences are also determined by the band you are working with when it comes to bridging connections. This means LOS is mostly preferred by higher frequency bands as the lower wavelengths aren’t actually effective when it comes to multipath transmission, upon encountering obstacles.
Still, if you are a bit confused as to how the LoS connections pan out, consider the working of a simple Morse Code transmission that requires one laser pointer receiver to look the other in the eye. Therefore, LoS bridging is all about the visual proximity and not the actual nearness of the transmitter and receiver.
For a signal to qualify as an LoS link, both the points need to be at the ground level and the maximum distance should be close to 5km. However, you can always raise the antennae to increase the distance but not at the expense of increased attenuation.
3. NLoS Connections
If you plan on setting up Non-Line of Sight or even Near Line of Sight connections, we would recommend low-frequency bands. One such example is the bridging system launched by Radio Labs, working on the 900MHz band.
This way, the longer wavelengths associated with this band can penetrate through minor obstacles without compromising throughput. Most NLoS setups are handy when high-frequency systems have failed in the wake of poor weather conditions.
4. FSO Links
Laser Links or ‘Free Space’ Optics are more like bridges that have optical signals as the backdrop. Unlike RF bridges, the connections are immune to radio and electrical interference. FSO links are also license-exempt, making them easy and cost-effective to implement.
Still, it is necessary to value the LoS for the FSO lasers as any obstacle can minimize the throughput. Plus, the speed-centric limits are pretty evident, allowing the bridge to reach speeds of up to 1Gbps for up to 3km and something in the range of 100Mbps for the 4-5km range.
Based On Connections Licensing
1. Licensed Bridging
These bridges take the licensed radio spectrum into account, which is government-issued, and levy operational fees. However, for this form of bridging to work effectively, it is necessary to use the right equipment for the job.
2. Unlicensed Bridging
Not every frequency brand falls under the bureaucratic pedantry and allows the users to operate bridges across diverse wavelengths, at lesser costs, and with minimal interferences.
However, licensed and unlicensed bridging has minimal technological relevance.
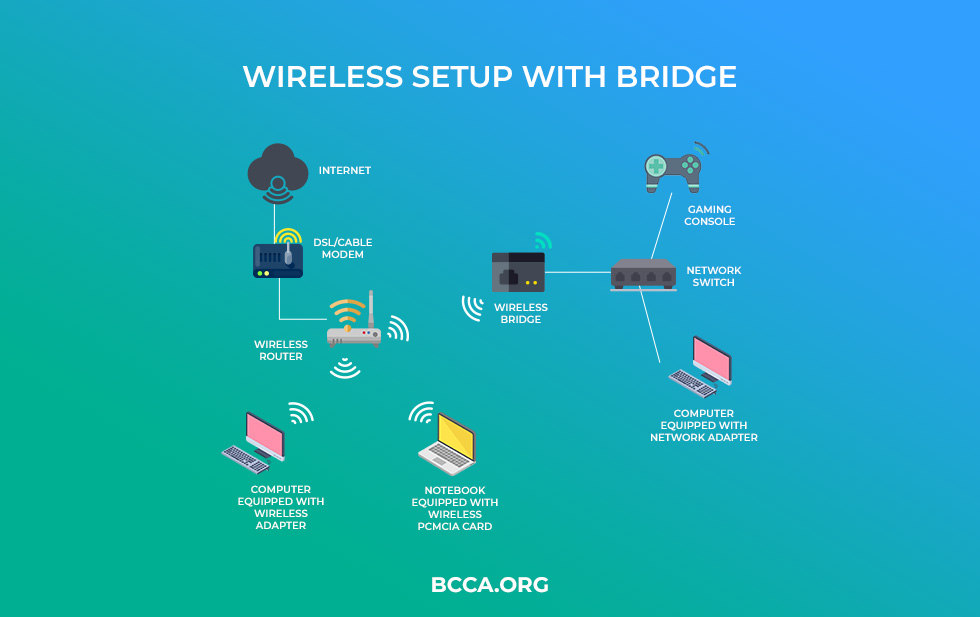
How to Extend the Network With Wireless Bridge?
Wireless bridging can be a complicated task in itself. However, we shall keep this section lucid and uncomplicated, simply for the sake of understanding.
Here are the aspects that you can follow to extend a wireless network using a wireless bridge. However, we shall also talk a fair bit regarding switches and access points for making the most of the Wireless bridges.
- Ascertain the Network at Hand: Before you can even start implementing the bridges, it is necessary to understand more about the nature of the network. Basic home networks are capable of working with access points and switches as the wiring is hardly an issue. Plus, in some cases, power line adapters can also make the cut.
However, if setting up a wired premise is an issue, it is always advisable to connect bridges to the network but at strategic positions. - Find the Perfect Region for your Bridge: As a wireless bridge helps you set up wireless connections for the wired devices to use later, it is necessary to keep the same in close proximity to the router. In most cases, you can use a secondary router as a bridge by changing the configuration or firmware of the same. However, we shall talk about the same in the subsequent sections.
- Make Trial and Error Connections: Here comes the most important segment that concerns connecting the bridge to the network. Things become easy if the router and the bridge have the WPS switches, respectively. If and when pressed together, a dedicated and safe wireless connection is established, almost instantaneously.
If WPS support isn’t available, it is advisable to rely on the manual setup and you need to log into the PC for manually loading and logging into the web config panel of the bridge. For this, you need to connect the bridge to the PC via the Ethernet cable and even select from the list of the active SSID options.
However, regardless of the connection type, it is necessary to check for the bridge throughput before finalizing. In most cases, it is advisable to place the bridge in a region where the primary router is at least 50 percent active. You will then be intimated to select the identifier and the password to secure the bridge. - Experience a Wider Coverage Area: Now that your bridge has tapped into the primary network and brimming with internet access, you can connect the devices of your choice to the hub for them to be able to access the internet as well.
- Consider Switches, Access Points, and Finalize the Setup: While you are more or less set when it comes to connecting the bridge and extending the network, you can even consider using the same in cohesion with the switches and access points to extend the network, further.
A good way to extend the network further is by using a Switch first, so as to spread out the primary network even further. The switch can be connected in parallel to an access point, which allows you to connect the bridge as the last leg of the communication.
This way, the switch can provide Ethernet support to the nearby connections while the bridge is left to do the heavy lifting by making the connection to its farthest point.
Using the Old Router as a Bridge: How to make this work?
Convinced already but a bit sceptical regarding the cost of a brand new wireless bridge! Fret not as you can always convert your old router into a useful bridging device for achieving comparable results.
However, the process isn’t straightforward and requires a step-pronged approach:
Step 1: Check for router compatibility with the DD-WRT firmware.
For those who aren’t well-versed with how DD-WRT works, it is a Linux-powered framework, capable of replacing the existing firmware. Once this functionality is added, the old router becomes a pretty powerful bridge, allowing you to configure the WDS in the easiest possible way.
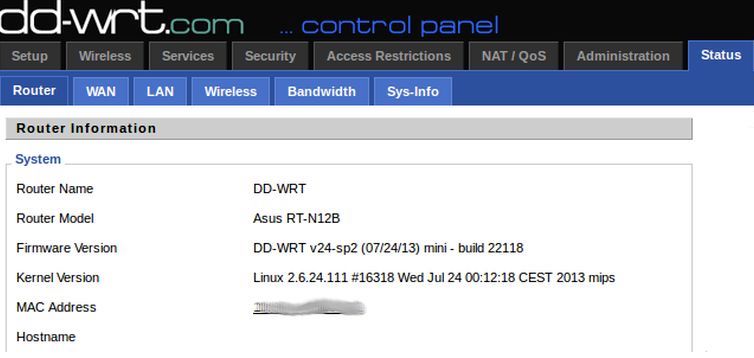
Step 2: If the router is supported, open the DD-WRT database and find the relevant firmware links. However, you should carefully read into the directions to install the firmware prep at the beginning, before moving ahead with the actual DD-WRT firmware.

Step 3: Once the DD-WRT firmware is successfully installed, perform a reset, thereby rebooting the router and starting it as a bridge. If you aren’t familiar with a hard reset, simply hold the reset pin for at least 30 seconds, till you find the flashing router lights.

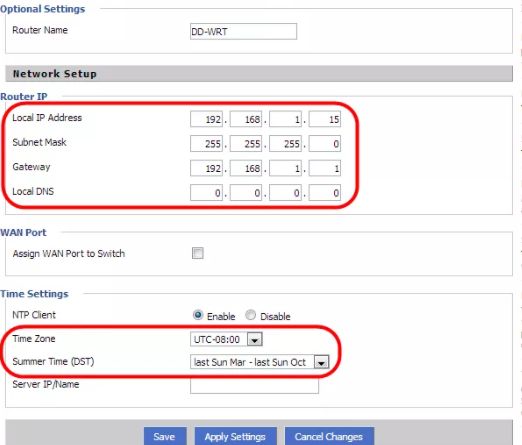
Step 4: Connect the old router to the PC via an Ethernet cable. Once done, try setting a static IP on the PC, something like 192.168.110. This way the bridge becomes a subnet of the main router.

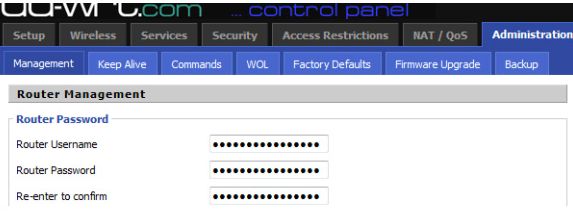
Step 5: Now access the web browser on the PC and use the subnet IP i.e. 192.168.11. This will open up the DD-WRT interface, allowing you to change the username and even the password.
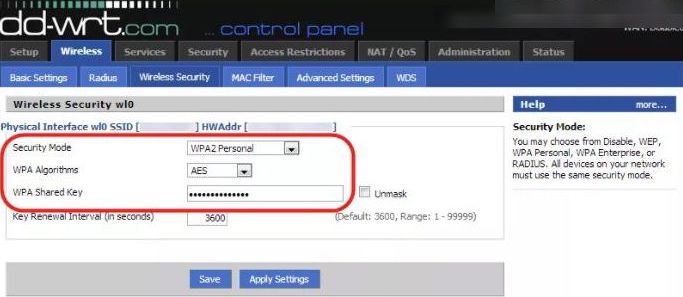
Once done, head over to the wireless settings and change the mode, shared key, and even algorithm from the Wireless Security settings.
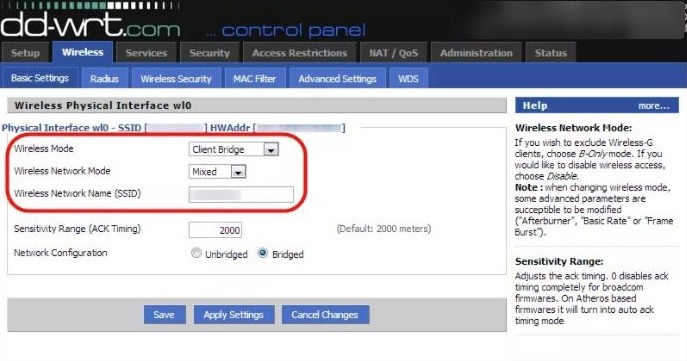
Step 6: The next step concerns accessing the basic settings and changing the existing wireless mode to the client bridge. However, the SSID and network mode of the primary router needs to be the same, regardless of the point in the network that you place the bridge. Save the settings and head over to the next step.

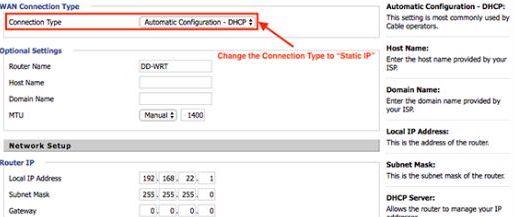
Step 7: Head over to the setup and feed in the IP address that converts the router as a gateway. Also, if you want an additional LAN port, click on the settings and assign the WAN as the Switch. Do not forget to apply these changes and connect with us for a detailed representation and expert assistance, if you lose your way in between.
Step 8: Log in to the device with the new IP or you can even activate the DHCP mode for managing automatic IP allocation
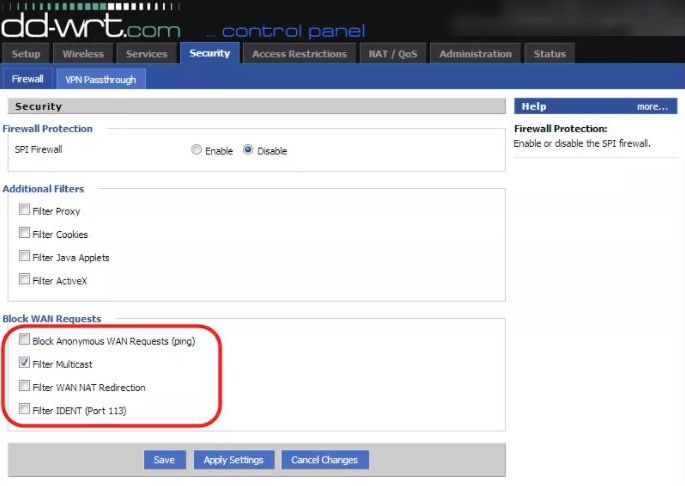
Step 9: Head over to the Security settings and block any kind of WAN functionality
Step 10: Disable the existing Firewall and apply settings

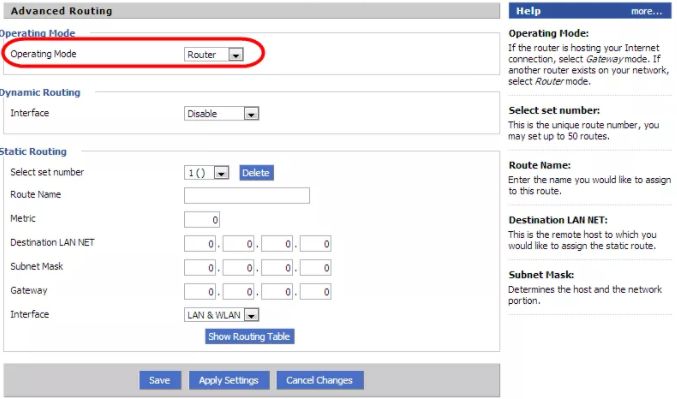
Step 11: Finally access the advanced routing mode and select ‘Router’ as the operating mode
Step 12: Enable automatic IP capturing and the connected bridge router then passes the same to the computer for updating the configuration details.
Step 13: Once the IP is verified, remove the Ethernet cable and allow the secondary router to weave its magic as a bridge.
These steps ensure that the router is connected to the primary network as a bridge and you can connect some of the wired devices to the same to extend the range of the wireless network.
Access Point vs. Wireless Bridge vs. Repeater
So we finally come to address the elephant in the room. While we did talk about each of these network components directly or indirectly in the aforementioned sections, it is necessary to give each component some well-deserved attention.
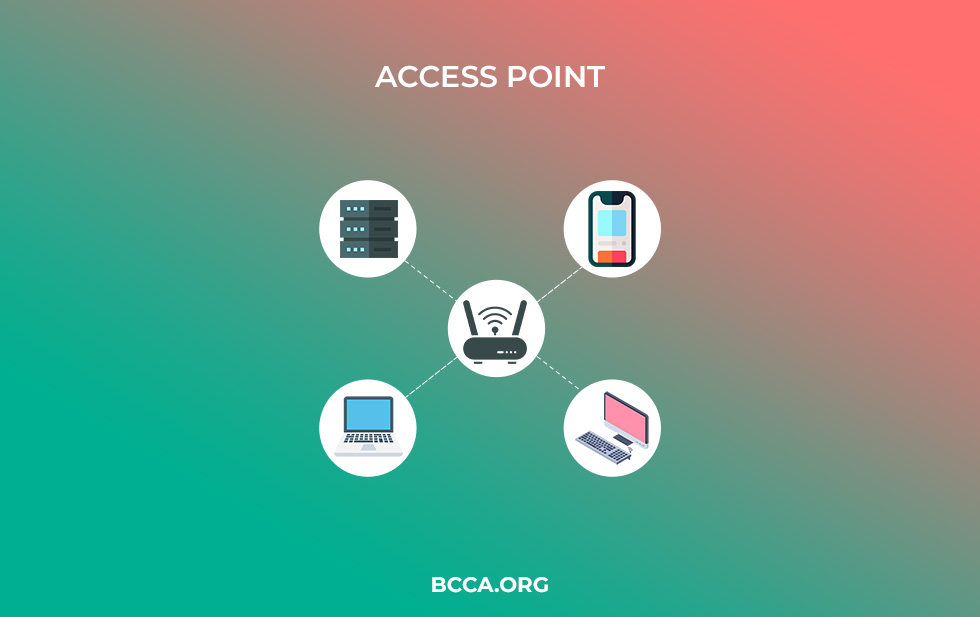
An access point is a device that takes your router a bit farther, especially for the wireless devices at a distance to take the advantage of. An access point ensures that the router coverage isn’t restricted by the walls as the same needs to be connected to the router via the Ethernet cable.
As a wired connection minimizes attenuation, the access point speeds and throughput are at par with the router, provided only one WAP is initially connected to the same.
A wireless bridge is more of an access point in reverse. This means, the initial connection i.e. the one with the router, is wireless, which makes concepts like FSO, LoS, and high-gain antenna, relevant. However, the router wirelessly feeds to the bridge, which then becomes the secondary routing device and allows wired internet access to the concerning gadgets.
A repeater strikes the perfect balance between the two by working more as a network extender. This means no wired connections, either at the origin or at the source, are required to make this work. However, unless it is Wi-Fi 6 compatible extender, the throughput is expected to take a hit.
Conclusion
Setting up a wireless bridge is a pretty straightforward task, provided you have the requisite hardware to set up a network. Still, you shouldn’t be using a bridge for the sake of it as this device must be included for extending the network to its farthest point if the inability to lay down wires and signal attenuation synonymous to basic repeaters is restricting your productivity.
While we have enlisted every point of relevance, do reach out if you have doubts regarding any of the mentioned sections.
Chris loves technology, specifically smart home technology! With both hands-on and executive leadership experience in his corporate career, Chris stays abreast of emerging technology and solutions and immerses himself in BCCA when not in the office.