Updating your router’s firmware can help your router perform better and also improve your network security. The firmware updates address a pre-existing bug or improve security features or add support to fast internet speeds. So it’s imperative to keep your firmware updated with every new release.
There are a couple of ways to upgrade your router firmware. Some of the modern-day routers come with automatic firmware updates. On enabling it, the router updates the firmware whenever a newer version of the software gets released. The manual update requires you to either manually start the installation or download the newer version from the router support website and update it.
In this article, I will walk you through the step-by-step process of updating the firmware using both ways.
Table of Contents
Before We Begin
Since this is your first time updating your router’s firmware, there are a few things you should be careful about. Treat this section as a checklist and ensure you check each before jumping into the upgrading process.
1. Go through your router’s manual: The router must have come with a user guide from the manufacturer; go through it once, especially where it mentions the firmware update process and its precautions.
2. Ensure your power supply is stable: Throughout the update process, your router and devices should be connected to electricity. So if you live in an area where power outages are common, we recommend using an uninterrupted power supply (UPS) to ensure that there are no unwanted power fluctuations.
3. Check the wire connections: During the update process, ensure your computer is connected to the router using an ethernet cable. You can also do it wirelessly, but using a wire is more stable and ensures your connection stays uninterrupted.
4. Download only the compatible firmware version: Ensure you are downloading the firmware compatible with your router’s model, and for that, check specifications from your manufacturer’s website.
5. When the update process starts, do not interrupt: Do not turn off or unplug the device from the power source unless explicitly instructed to do so.
6. Make a backup of your settings: If you use any custom configuration, it will get erased once your router is updated. So to avoid unnecessary hassle, make a backup of the configurations or simply note them down.
How do you back up router settings?
- Connect your PC to the router and go to your internet browser >
- Enter your router’s IP address in the search bar and go to the router’s web interface
- Enter your router’s login credentials. If you have not changed the password, you can find the username and password written on any of the labels on the router.
- Once logged in, go to the settings or administration section. The exact name of this option will vary with router models.
- Look for an option named “save,” “restore setting,” or “backup.”
- Click on that setting and follow the instructions given on the screen.
For making the backup, choose a secure location on your PC that you can easily access later.
Also, please note that not every router has this backup facility. So, in that case, manually note down or take a screenshot of your important router settings.
Such things could be your WiFi network name (SSID), WiFi password, port-forwarding configurations, or any other customized settings.
7. Verify updates after it is done downloading. For that, log into your router’s web interface or the mobile app of your ISP and check if the latest firmware version has been successfully updated.
8. Check if your router has auto-update. You don’t need to update the firmware manually and can relax if it has. To check that:
Go to the router’s web interface by entering your router’s IP address> Login with your router’s username and password.
How to Update The Router Firmware?
Now that you’ve read all the precautions let’s look at this step-by-step guide to update your router’s firmware.
Step 1: Finding the Router IP
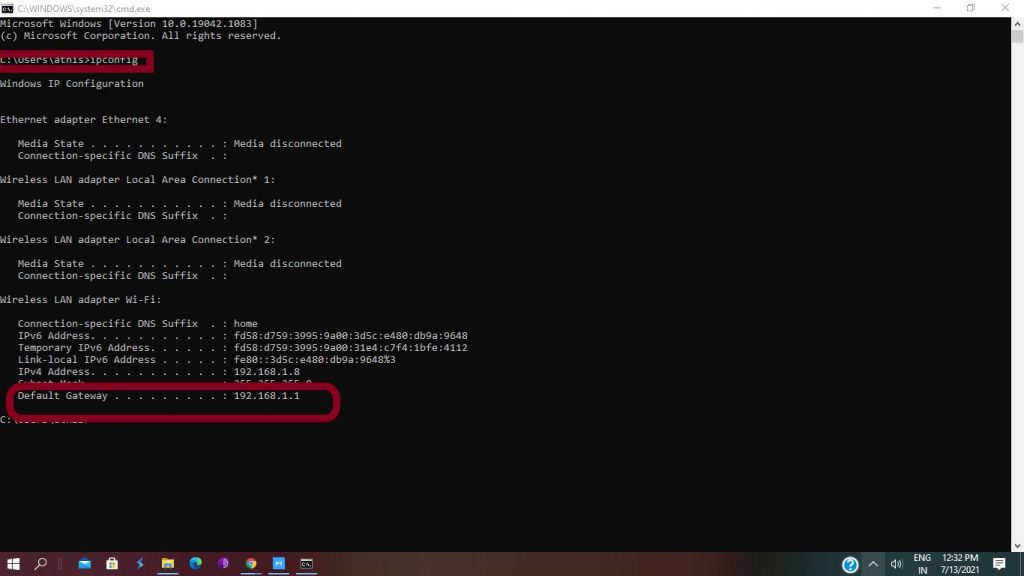
The first step in updating the router firmware is to log in to the administrator page of the router. You need the “Router IP” or “Default Gateway” to access the administrator page. You can find the IP of your router using the following methods:
In Windows:
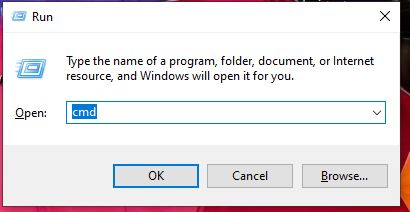
- Press Windows+R and Type cmd to open the command prompt
2. In the command prompt, type “ipconfig” and press enter
Your “Router IP” will be listed as the default gateway.
In Android:
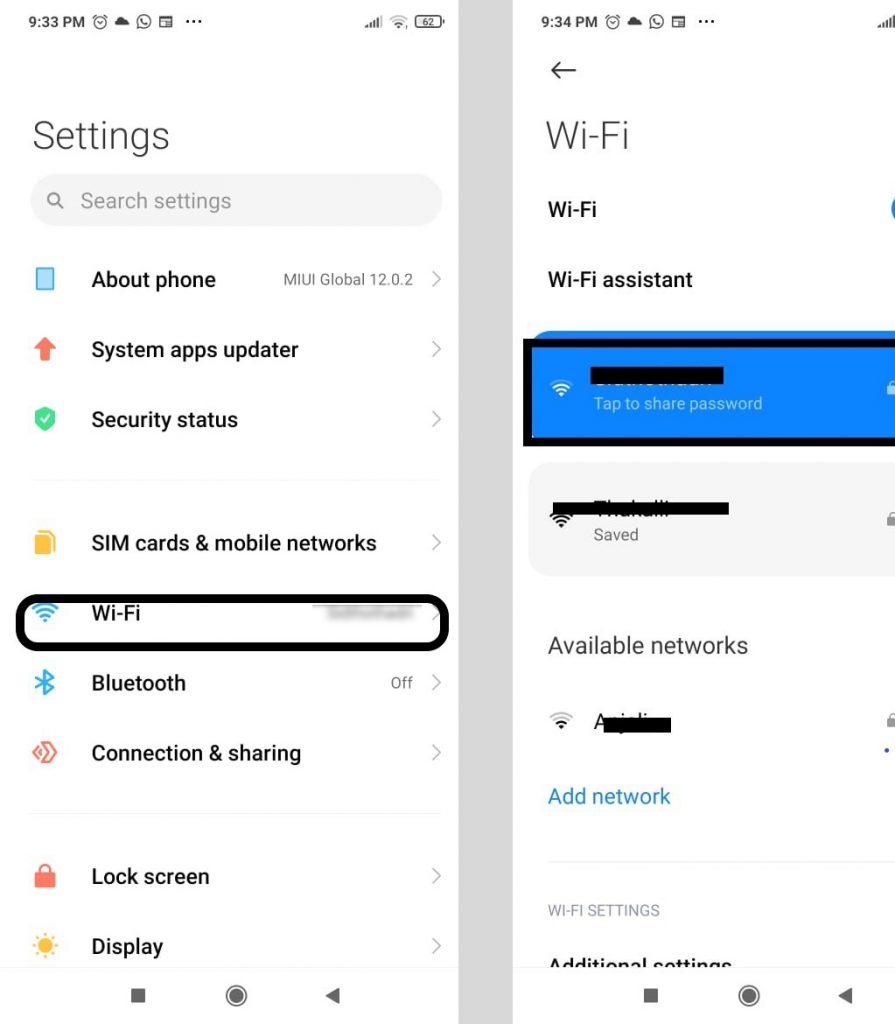
- Go to the Settings -> Wi-Fi of your smartphone
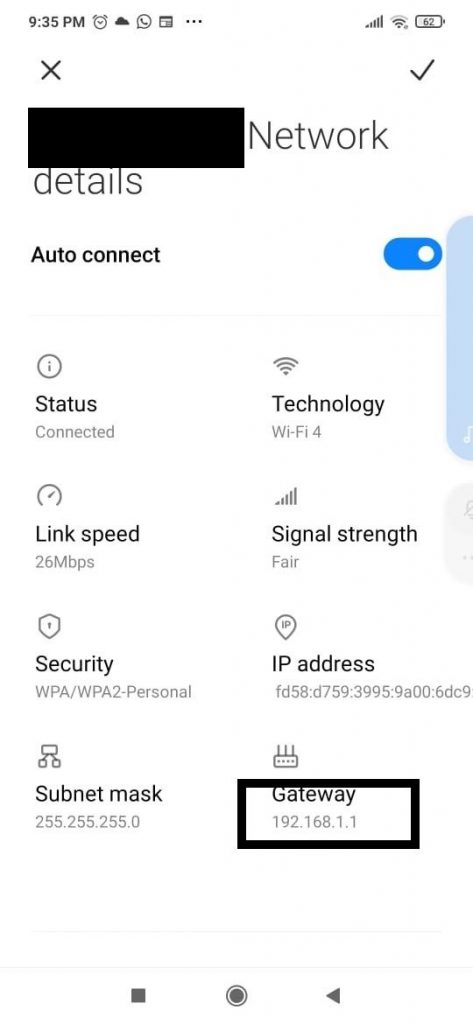
2. You can find the “Router IP” listed as Gateway
In Mac:
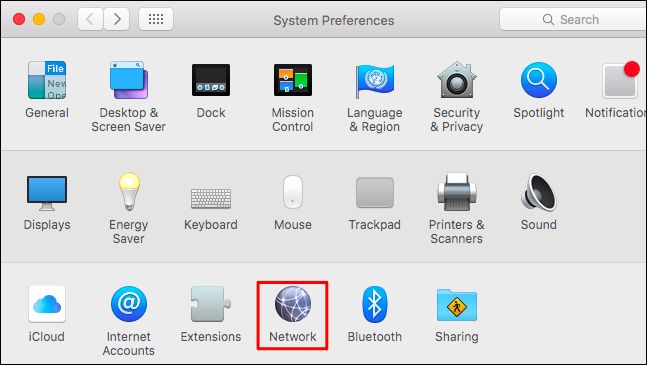
- Choose Network under system preferences
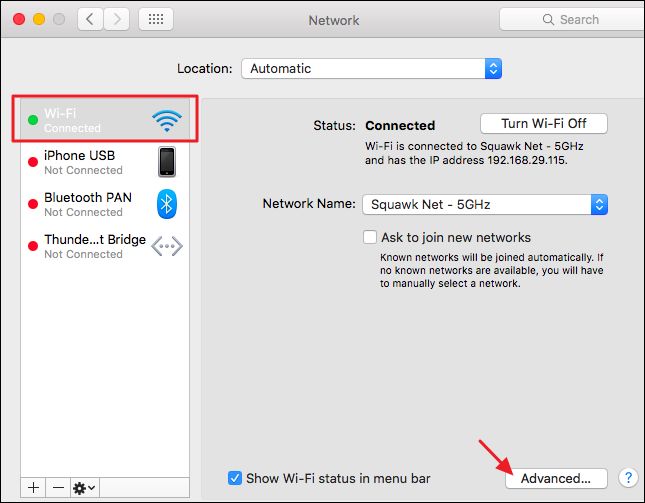
2. Select the Wi-Fi and click Advanced settings at the bottom right corner
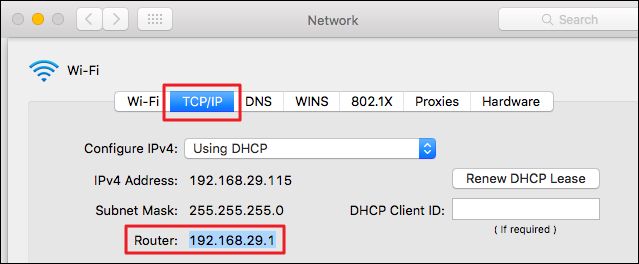
3. You can find the “Router IP” under the tab TCP/IP
Step 2: Log into the Administrator page
Once you have the “Router IP” from the last step, you can use it to access the administration page. Alternatively, you can give the URL given by your manufacturer. I have listed a few URLs from the most common router manufacturers.
- Netgear: Enter http://routerlogin.net
- TP-Link: Type in http://tplinkwi-fi.net
- Linksys: Enter “192.168.1.1”
- ASUS: Input “http://router.asus.com”
- D-Link: Enter http://dlinkrouter.local
Once you input the details in the browser and press enter, it will take you to the login page where you will have to enter the login credentials. Your username and password will be the default combination or the password you had set during the initial setup.
After completing the login, navigate to the configuration to perform the firmware upgrade. Please find the step-by-step process to complete the firmware update.
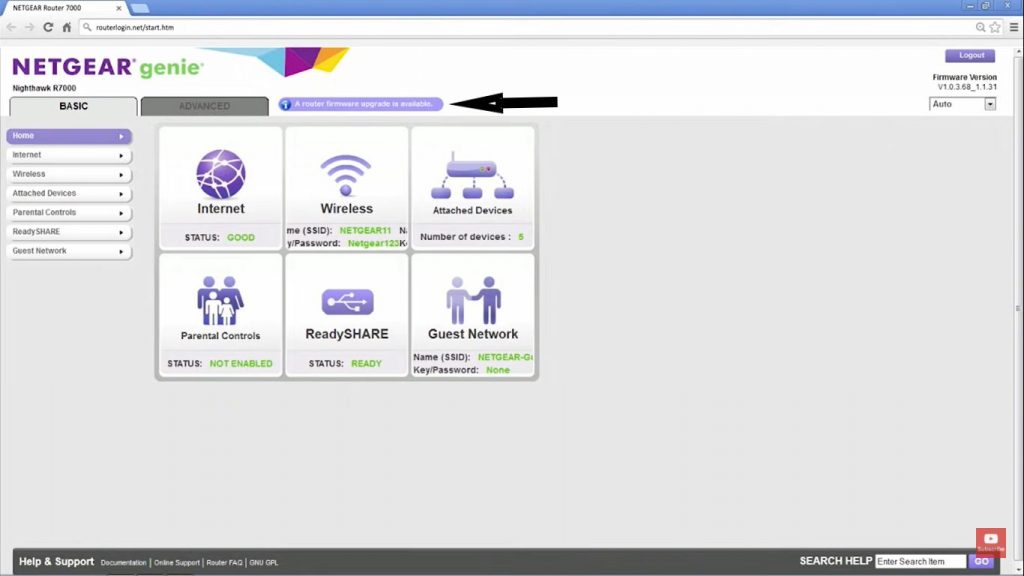
- Once you login into the page; Most router pages will have a notification on the home page if there is an update.
2. Check & Locate firmware
It will take you to a page where you can update the firmware from your local drive if you have it ready or you can click the “Check” button to check for a newer version.
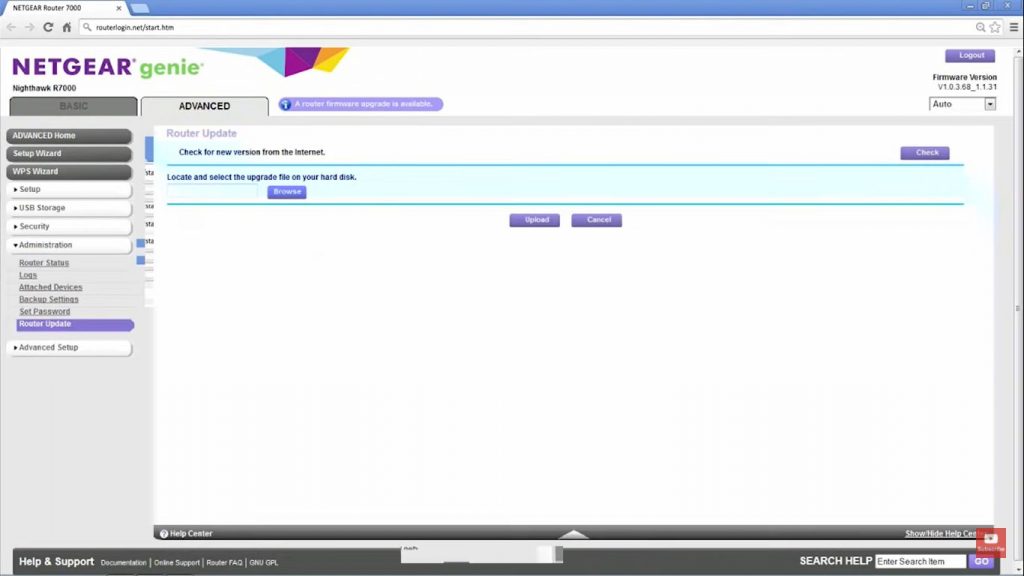
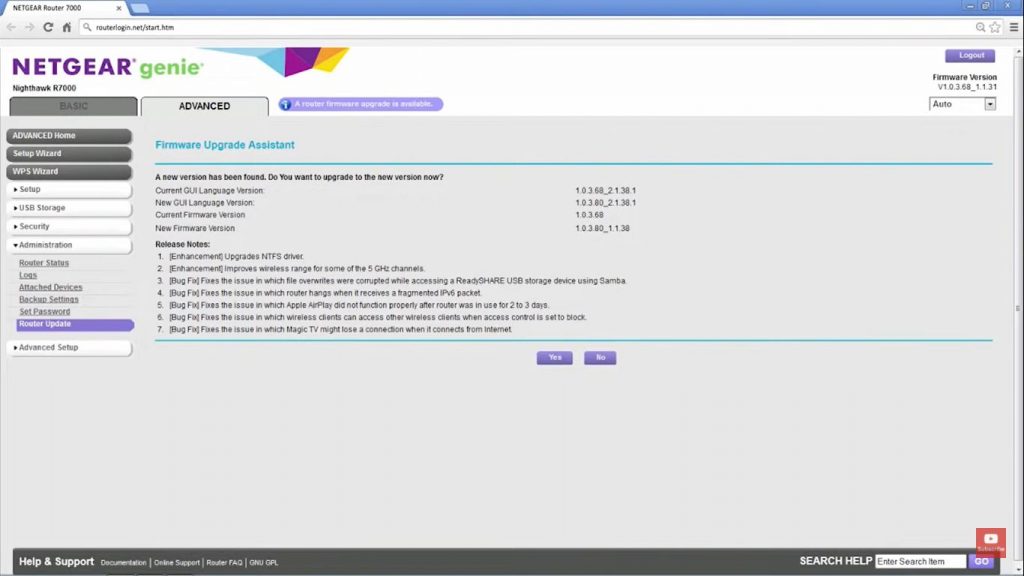
3. Click “Yes” to initiate the firmware update, once the processing is complete
Once the check is complete the firmware upgrade assistant will furnish the details of the current version and newer version (if available).
Manually Updating the Firmware
If you choose to update the firmware manually, please follow the mentioned process
1. You can go to the support page of your model. Click the ‘Downloads‘ button.

2. Scroll down to find the requisite version
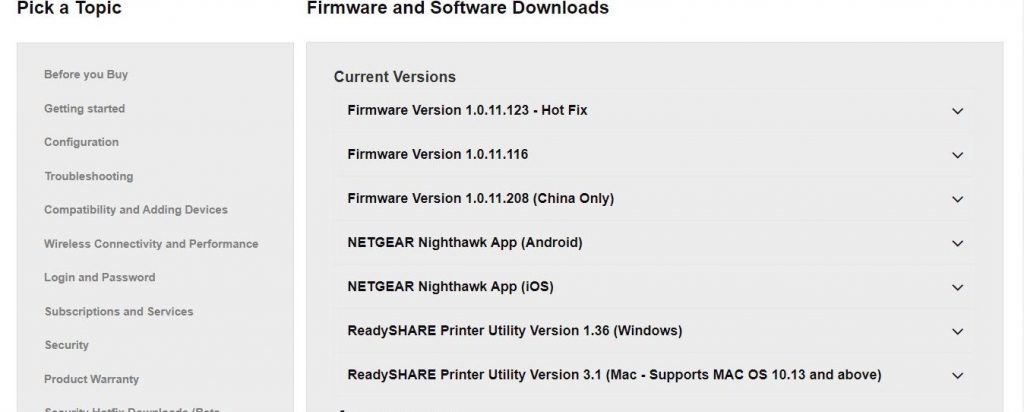
3. Download the file to the local hard disk
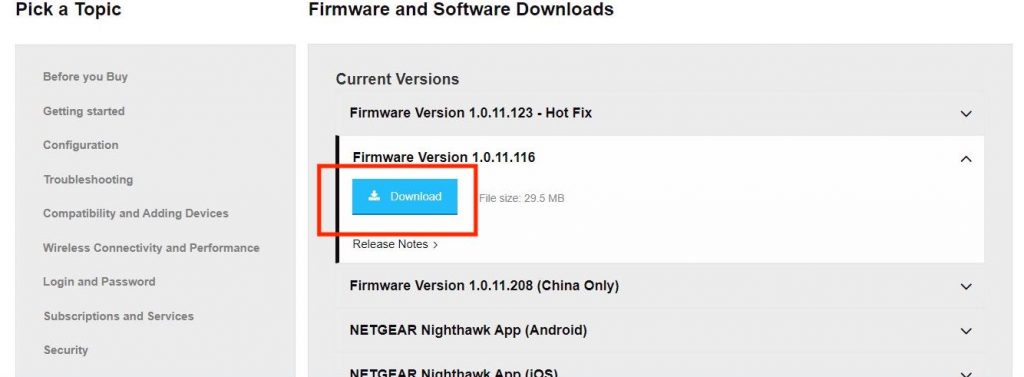
4. Go to the Advanced tab -> Administration- > Router update

5. Click browse, choose the downloaded file and click upload
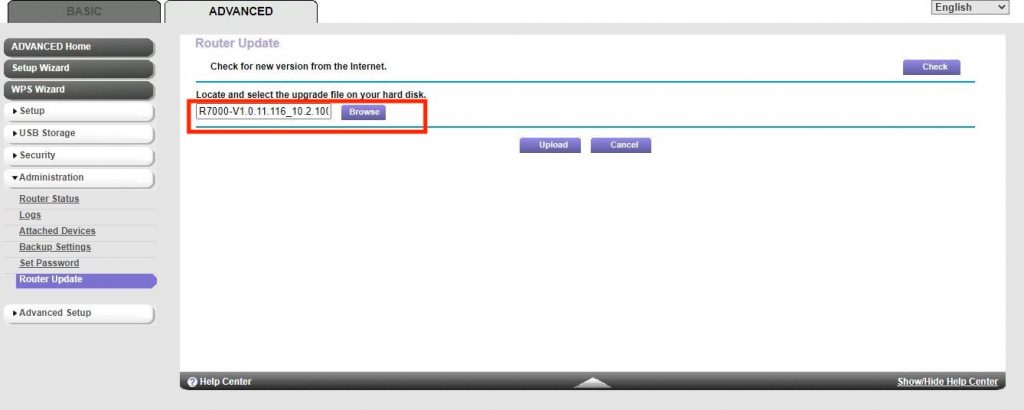
Once the file is uploaded, the update will start.
Setting Auto-Update For Router Firmware
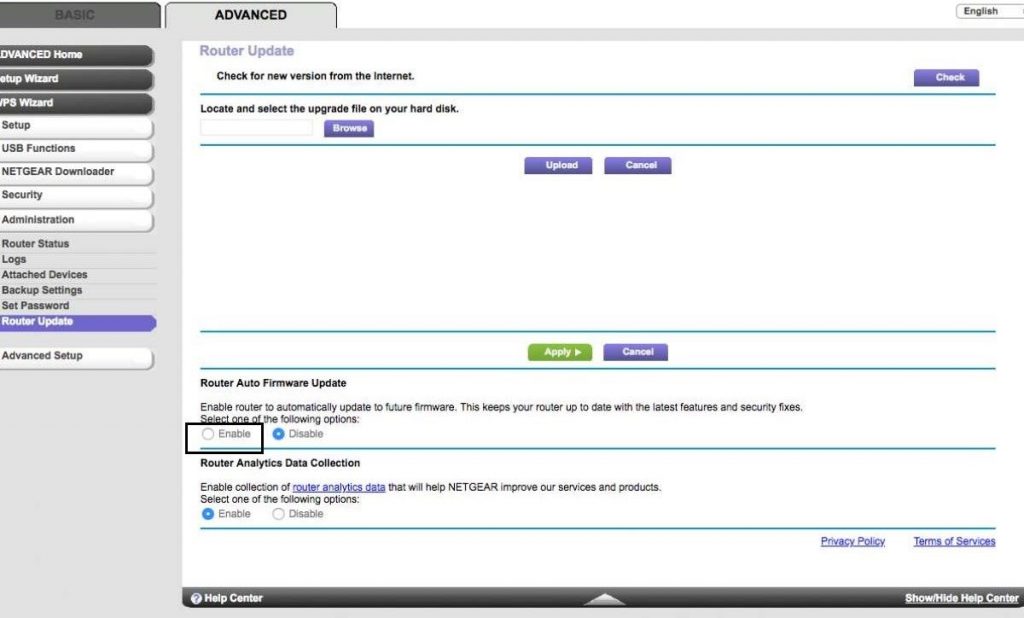
The most recent routers have the facility to enable auto-update. Once enabled the router updates the latest version of the firmware whenever it is available.
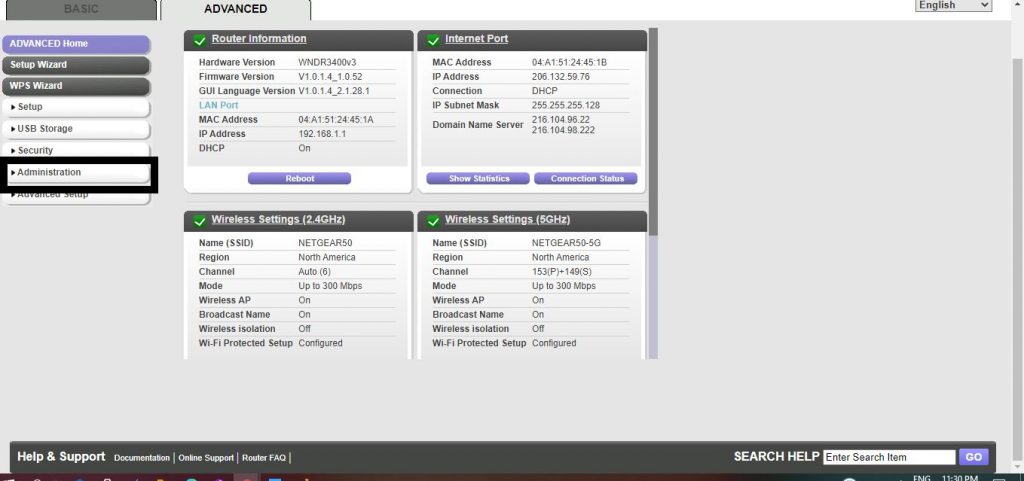
- Go to the Advanced tab -> Administration. Next, click ‘Router Update‘
- Under the Router Auto Firmware Update, Click Enable and then Apply
FAQs
It is the opposite. A firmware update of any kind is brought to you by your router manufacturer to reduce vulnerabilities by providing security patches to enhance performance.
If your router is not updated regularly, it increases the risk of security vulnerability, and your system might get slower.
Since new firmware updates fix bugs, ensure better security, and keep your router head-on with new technology, it is easier for your router to provide a better and faster internet speed.
Conclusion
Don’t interrupt the update process at any point. Ensure the router has a continuous power supply during the installation. Once the firmware is updated the router will restart and the internet will be resumed on login.
While updating the firmware is crucial to its performance, any interruption to the firmware update can corrupt the router and render it unusable. It’s advisable to take professional help if you are not confident of the entire process.
Chris loves technology, specifically smart home technology! With both hands-on and executive leadership experience in his corporate career, Chris stays abreast of emerging technology and solutions and immerses himself in BCCA when not in the office.
