
The internet has become a requirement for people during this lockdown situation. Any network connectivity problem is an inconvenience for users. The latest concern among netizens is the issue of “Ethernet not working, but wifi is.”
This query has gained popularity in search engine rankings. Many Windows users (including Windows 10, 8, and 7) are experiencing situations where their Wi-Fi connection works fine, but their ethernet connection does not.
Establishing an internet connection via a network adapter requires a MAC address. This applies to both ethernet cables and Wi-Fi connections. When switching from wifi to ethernet, the MAC address should automatically adjust accordingly.
If this doesn’t happen as expected, it can result in internet connection issues, ultimately leading to a situation where the ethernet connection doesn’t work while wireless connectivity remains unaffected. Other factors contributing to this problem will be discussed further in this article.
However, there’s no need to worry as this is an issue that can be resolved. Just follow the methods mentioned in this article to find answers to why your wifi works and your ethernet connection does not.
Table of Contents
Why Does Your Wi-Fi Works While Ethernet Does Not Work?
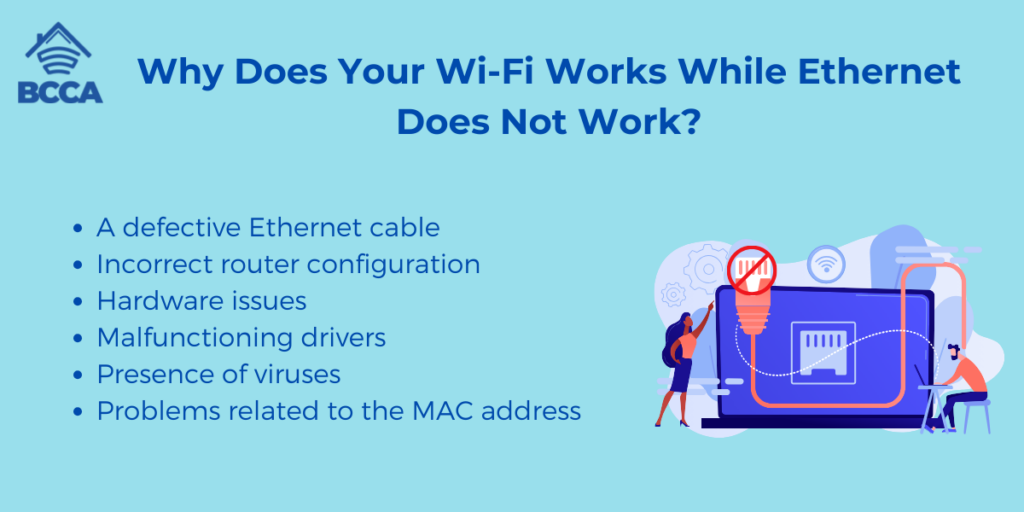
Ethernet issues can range from something like a disconnected cable to more intricate problems like incorrect wire terminations. Regardless of the severity, the majority of ethernet problems can be resolved.
Some of the common reasons why this error may occur:
- A defective Ethernet cable
- Incorrect router configuration
- Hardware issues
- Malfunctioning drivers
- Presence of viruses
- Problems related to the MAC address
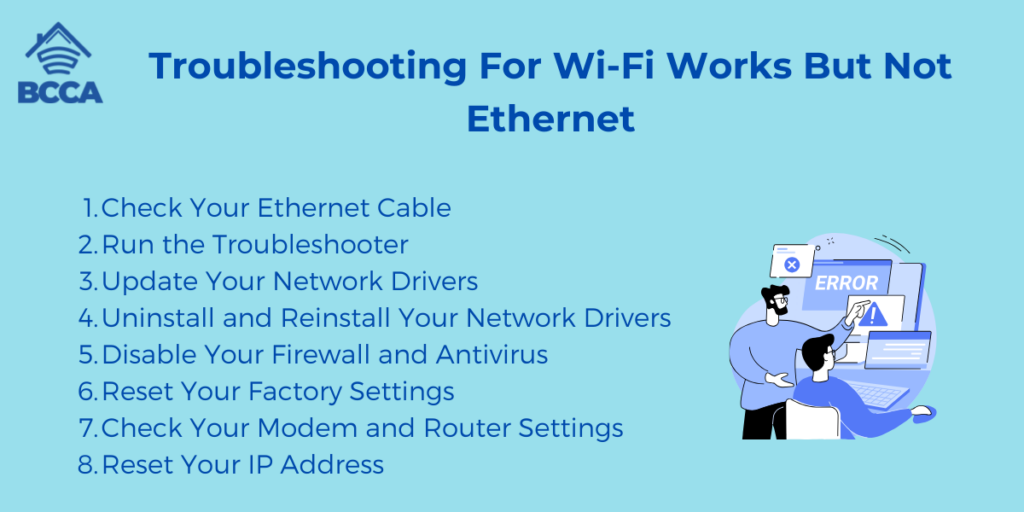
Troubleshooting For Wi-Fi Works But Not Ethernet
To troubleshoot the issue of Ethernet not working while Wi-Fi is functioning properly, start by examining the connection between your computer and the Wi-Fi router. If you find that Wi-Fi is functioning without any issues, but Ethernet is not working, there could be several reasons for this situation.
1. Check Your Ethernet Cable
Make sure you have checked your Ethernet cable properly. It’s essential to ensure the cable is connected correctly to get your internet connection up and running.
First, unplug both ends of the Ethernet cable and reconnect them, ensuring that each end goes into the port. Once you’ve done that, restart your modem and router by disconnecting them from power for 30 seconds before plugging them in.
If, after checking the cables and rebooting everything, you still don’t have an internet connection through Ethernet, try connecting another computer or device to the modem using an Ethernet cable. If this connection works, it indicates that there might be a problem with your router, firmware, or incorrect settings causing the issue.
To resolve this, you can usually update your router’s firmware. Review its settings based on what’s recommended by your internet service provider (ISP).
Completing these steps should help you overcome any obstacles preventing access via Ethernet. Whether it was a bad cable or a serious issue like a problematic router component or incorrect setting, now you know how to diagnose and resolve such problems so they won’t keep you offline any longer.
2. Run the Troubleshooter
Easily troubleshoot your network connection with the built-in Network Troubleshooter in Windows. It’s a tool for identifying and resolving internet connection problems.
The Network Troubleshooter will scan your computer to find any existing network connections, detect any issues, and then provide solutions to fix them. To access the Network Troubleshooter, simply navigate to Control Panel > Security > Troubleshooting > Network.
From there, choose the option to ‘Run the troubleshooter,’ which will guide you through the process of identifying and addressing any networking problems you might encounter.
The Network Troubleshooter is designed to be user-friendly, so even if you’re not particularly tech-savvy, you should still be able to use it without difficulty. Once it completes its tests, it will generate a report with details about what it discovered and potential solutions for resolving those issues.
3. Update Your Network Drivers
To optimize your internet connection, it’s a great idea to update your network drivers. Doing so is usually straightforward and doesn’t require any technical expertise.
Start by identifying the type of network card or chipset installed on your computer. You can find this information on the manufacturer’s website or in the device manager. Once you’ve determined the correct network driver needed, use your search engine to find and download it from a trusted source onto your computer.
Carefully read all instructions before proceeding with the installation process. It’s important to download drivers from sources such as the manufacturer’s website or Microsoft Update Catalog, as unreliable sources may introduce more problems instead of solving them.
After successfully downloading and installing the driver, restart your computer. Check if everything is working properly. In case any issues persist, additional troubleshooting steps might be necessary. However, updating your network drivers should generally help restore operation.
4. Uninstall and Reinstall Your Network Drivers
If you’re still facing issues with your connection, you might want to consider uninstalling and reinstalling your network drivers. The steps are quite easy; just head to the device manager in your control panel and choose the option to ‘uninstall the device.’
This will remove any corrupted driver files that could be causing conflicts with new ones. Once all the old files are gone, you can install copies of the latest drivers available for your network card.
Ensure to double-check that you’re getting the apt version of drivers for your hardware before downloading anything. If you don’t have an internet connection, an alternative is using a drive or USB stick to transfer them from another computer.
Remember to enable all security features on both devices during this process. After everything is installed correctly, restart your system.
Getting everything working as intended may require some modifications in settings. But now you’ll have a clean start when troubleshooting further. Who knows? You might even discover that something else was causing issues before.
5. Disable Your Firewall and Antivirus
If you’re looking to boost your internet speed and minimize interruptions, you might want to turn off your antivirus and firewall. This can alleviate strain on your computer’s resources, which may be the cause of low internet speeds.
To disable them, navigate to the settings menus in the Windows Control Panel for both programs. Switch them off for a few minutes.
Moreover, it’s worth noting that an antivirus or firewall program could potentially block ports or IP addresses, causing issues accessing websites via Ethernet. If this is the case, disabling either of these programs should quickly resolve the issue.
However, it’s important to consider that disabling these programs leaves your computer vulnerable to malware and viruses. Therefore, ensure you take the necessary steps after implementing any changes.
6. Reset Your Factory Settings
If you’re facing issues connecting your devices to the internet, a helpful solution is to reset your network settings. This will allow you to start afresh and quickly regain access. It can effectively resolve any conflicts that might be hindering your connection or causing it to drop.
Moreover, resetting your network settings ensures that the appropriate type of connection, whether wired or wireless, is being utilized. To perform this task, follow these steps:
- Open the Control Panel on your computer
- Select “Internet”
- Click on “Network and Sharing Center”
- Choose “Change Adapter Settings”
- Right-click on each adapter. Select Disable and then Enable
After completing these steps, restart your device and try to reconnect. If you still encounter connectivity issues despite resetting the network settings, it’s advisable to seek solutions for resolving the problem.
You might need to check for driver updates or update Windows itself if necessary. Additionally, ensure that all cables are securely connected in the area where you intend to establish a connection for smooth functioning.
7. Check Your Modem and Router Settings
To regain control over your internet connection and resolve any disruptions, it’s worth exploring the settings of your router and modem. By examining the workings behind the scenes, such as resetting your router or adjusting settings, you can potentially identify why your Ethernet is acting up while your WiFi remains unaffected.
Although it may seem tedious to review each setting, it’s a worthy endeavor if you want reliable and secure access. Begin by changing the passwords associated with both devices as a security measure, only you should have access to them.
Also, explore settings such as channel bonding, port forwarding, parental controls, MAC address filtering, and more. These options greatly impact how data flows throughout your home network.
Taking this step will provide you with an understanding of how all our digital technologies harmonize. Even possessing an amount of information about networking technology can make a difference when troubleshooting an issue like this. With some luck and experimentation with the settings, before you know it, you’ll be online.
8. Reset Your IP Address
To improve your connection and optimize both wired and wireless connections, it can be beneficial to reset your IP address. Regardless of whether you’re using ethernet or wifi, resetting your IP address can make a big difference to the functionality of your connection.
Follow these steps to reset your IP address:
- Start by accessing the Start menu on your computer, then select Control Panel
- From there, navigate to Network and Internet. Click on it to reveal its options
- Next, locate Network Connections and right-click either on Local Area Connection or Wireless Network Connection, depending on the type of connection you wish to reset.
- Finally, select Properties from the displayed list. Then choose Internet Protocol Version 4 (TCP/IPv4)
- Once selected, click on properties again. In the resulting dialogue box, choose Obtain an IP address automatically from the menu at the bottom
- Once you have completed these steps, click OK. Restart your device
By doing this, you will initiate a fresh start with your internet connection.
Following these steps will assign an IP address to the network adapter in use, whether it be ethernet or wifi, so don’t hesitate to try this method if previous solutions have proven ineffective.
However, do remember that if your device has an incorrect IP address, it could lead to issues or even hinder your ability to access specific websites or online services due to conflicts with firewall protocols. Therefore, it is always advisable to verify any modifications properly before proceeding.
Frequently Asked Questions
The Local Area Network allows computers to connect using LAN cables. If your Ethernet suddenly stops working, it could be due to issues with your LAN cables or network drivers. To prevent this problem, make sure to monitor the condition of your cables and drivers.
To reset your Ethernet connection, start by clicking on the Start Button located on the side of your keyboard. Then, navigate to Settings, followed by Network and Internet. This will take you to an Advanced Network window. From there, select the option for Network Reset and confirm by clicking Yes.
No, your ISP is not responsible for any hardware or software problems you may encounter. Their responsibility lies in providing internet connectivity, low latency, and reliable speed.
Wrapping Up
To wrap things up, if you come across difficulties with your Ethernet connection even though your WiFi is working fine, it’s important to troubleshoot the problem in a systematic manner.
By following the steps provided in our guide you’ll be able to identify and resolve issues, ensuring a dependable wired internet connection. Whether it involves checking cables, adjusting settings, or addressing network problems, approaching the situation methodically will help you restore your Ethernet connection quickly.
Keep in mind that a little troubleshooting can make a big difference in maintaining a seamless online experience.
Chris loves technology, specifically smart home technology! With both hands-on and executive leadership experience in his corporate career, Chris stays abreast of emerging technology and solutions and immerses himself in BCCA when not in the office.