
Are you worried about the wireless dead zones spread uniformly across the home? Or, are you planning to extend the range of your wireless router without having to invest in a new router with supposed Beamforming support or mesh-specific compatibility?
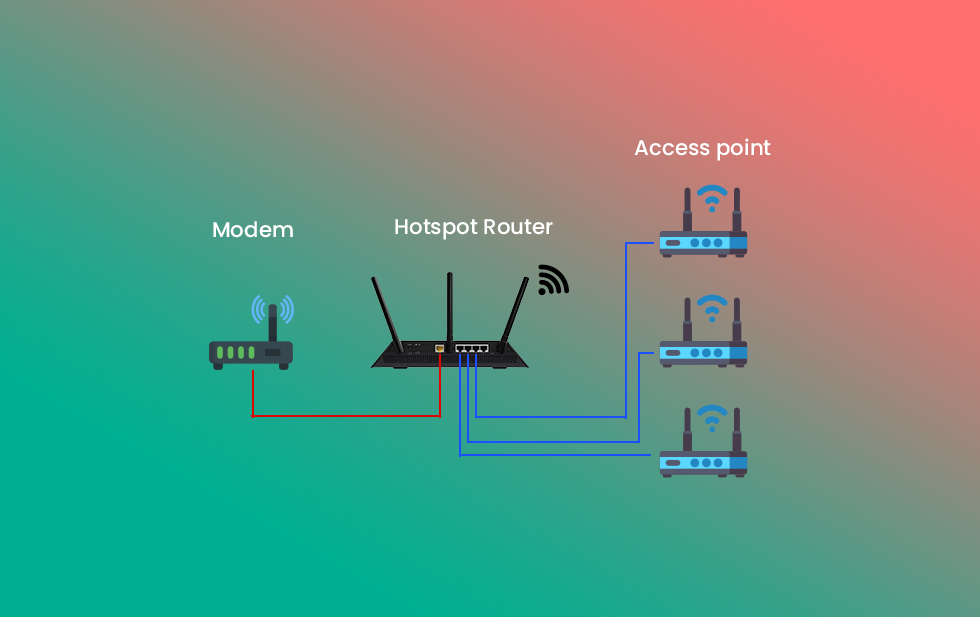
If that’s what you want to do, it might just be the time to set up a holistic wireless network with several access points in play, thereby canopying or rather enshrouding the entire area with a blanket wireless network. But then, it’s not an easy process, even networking experts get confused while creating a Wi-Fi network with multiple access points, that’s why this guide shall be very helpful.
Most users find it hard to account for the DHCP-specific complexities, SSIDs, and even other aspects of router and access point configurations. Other pain points, in this regard, include different SSIDs for the APs, which defeat the purpose of covering each under one, unified network.
It is important to keep an identical security key for every access point, in order to make the client transitions as smooth as possible. Considering these pain points and existing issues pertaining to router and access point configuration, I have decided to put together an explainer to help you set up multiple access points as a part of a bigger and integrated wireless network.
Table of Contents
Pre-Requisites
Before you plan on setting up multiple access points, you need to understand that accommodating them as a part of the single network is possible only if you set the same SSIDs for each AP followed by an indistinguishable network key for seamless handoffs.
However, you can still go with different WPA2 keys but then the wireless devices will have to be connected manually, each time it moves to a different access point.
How To Use Old Router As An Access Point?
You need not throw away an old and obsolete router even if it has outlived the life expectancy. Instead, you can deploy the same as an access point by making a few modifications. Also, before you skim through the steps, you need to understand that every router has access points embedded within, the number of which might vary depending on the type of bands supported by the concerned routing device.
Here are the steps you can follow to transform an existing router into a fully functional access point, to be used later in this discussion.
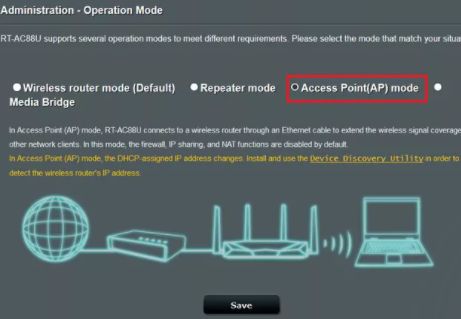
Method 1: Setup with dedicated AP mode
If your router has a dedicated AP mode, you need not worry about following the subsequent steps and can simply turn on access point mode. This way, you can ready the same as a single part of your multi-access point setup, which then is considered as a part of the comprehensive wireless network.
Method 2: Setup Native Access Point
If you are still clinging onto a pretty dated router that doesn’t have a native access point configuration in store, you would want to completely overlook the WAN port as connecting any Ethernet feed to the same will force it to work as a router, which apparently is its supposed function.
Also, if you are a habitual WAN port user, I would recommend you to cover it up with a piece of tape to avoid using it as a slip-up. However, if the existing router comes fortified with the AP mode, you need not overlook the WAN port as it would then function as a LAN port and eventually add to the wired capabilities of the access point.
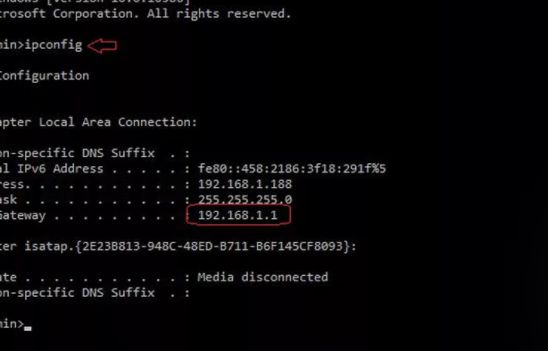
Step 1: Find default IP address
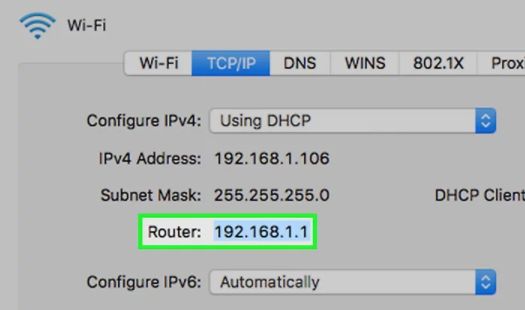
Discover the IP address of the primary router by typing in CMD in the ‘Start menu’ of the Windows 10 interface. Once the command prompt shows up, type in the ‘ipconfig’ and press the Enter tab. Once the default gateway IP shows up, you can use it as a reference address for the primary router.
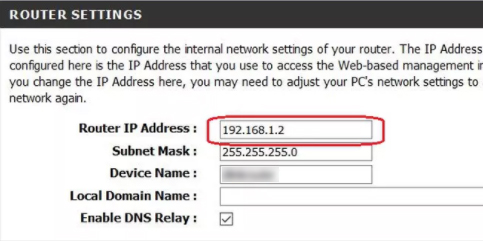
Step 2: Change IP address of Access Point
Configure the IP address of the secondary router or the router you intend on transforming into an access point. Log in to the web interface of the same and set an address that falls within the range of the primary IP. For instance, if the primary IP reads 192.168.1.1, it is better to set the secondary router or the access point IP as 192.168.1.2.
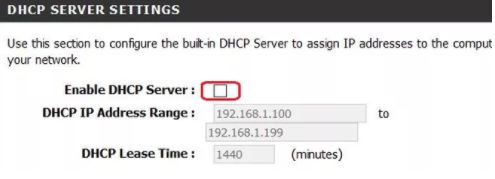
Step 3: Tun Off DHCP
Once the IP is set, turn off the DHCP function for disabling the auto IP generating capability of this router. Disabling the feature and eventually assigning a static IP automatically converts the router to an access point.
How To Use New Router As An Access Point?
Now that you know the trick to transform any old router into an access point, you can deploy the same strategy to make use of other unused/new routers and get hold of as many access points as required to increase the range of the wireless network.
You can either purchase an access point with no WAN port or configure one as per the strategies enlisted in the aforementioned section. Here are the steps to follow:
Step 1: Connect AP with Primary Router
Once you have an access point ready, you need to connect it to the primary router’s LAN interface, via the Ethernet cable.
Step 2: Primary DHCP Setup
You need to make sure that only the primary router has the DHCP mode enabled to help access dynamic IP addresses. Also, the access point, by this time, needs to have the static IP enabled, provided you want to use it as a part of a single wireless network.
I have already mentioned the IP setup in the previous segment while talking about deploying a used router as an access point. So you can check that if required.
Step 3: Set SSID on AP
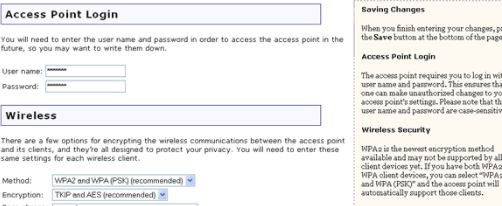
Once you have assigned a static IP, ensure that the SSID of the access point is identical to the primary router. Plus, you also need to enable the Wi-Fi ‘Protected Access’, which inadvertently needs to be the same as that on the primary router.
This way it becomes easier for the wireless clients to hop onto the preferred access point automatically, depending on the range, coverage, and signal strength.
The existing process works for a single access point and similarly, you can configure and pair multiple access points to make the wireless network wider and stronger.
Frequently Asked Questions
Adding several access points to an existing network can cause co-channel interference as each AP emits radio waves and usually works on the 2.4GHz and 5GHz, simultaneously. However, a good way to combat the same is to access the web interface of each access point and balance out the bands, use a non-overlapping spectrum, and restrict Beamforming capabilities.
While having identical SSIDs can help manage the entire network better, they can stop the access point from working as a part of the same network if the concerned devices are from different manufacturers. However, the primary router needs to have the DHCP mode activated to provide IP coverage to the APs and even the wireless clients.
Unlike access points that connect to the primary router via an Ethernet cable, the wireless connection between the two is termed bridging. However, for activating the bridge mode between two routers, you need to configure them a bit differently as compared to the standard AP configuration.
Yes, you can set up 4 separate networks at most with only one router at your disposal. This involves accessing every wireless protocol there is, including 802.11a, 802.11b, 802.11g, 802.11n, or 802.11ac, for a standard AC router, with each network having its own SSID and one of the mentioned protocols.
In simpler terms, you can set up one primary 2.4GHz and one guest 2.4GHz network, whilst following the same suit for the 5GHz band.
Conclusion
Setting up a single wireless network with multiple access points is a standard practice in university campuses, corporate offices, hotels, and other establishments where wireless clients and the need for extended coverage are paramount. However, if you follow the mentioned steps to the letter, you can set up the desired network seamlessly enough, without going through the hoops.
Chris loves technology, specifically smart home technology! With both hands-on and executive leadership experience in his corporate career, Chris stays abreast of emerging technology and solutions and immerses himself in BCCA when not in the office.